Kaizen User Guide
Welcome to Kaizen, an AI agent platform built by Kamiwaza. Kaizen lets you create AI agents that go beyond simple chat. They can execute code, search the web, connect to corporate tools like Microsoft 365, and produce polished deliverables like charts, PDFs, and presentations.
Instead of writing code to configure agents, you get a visual interface. Instead of terminal output, you get a real-time chat where you can watch your agent work and download what it produces.
If you launch Kaizen from the Workrooms page (or from the deprecated Workroom Manager extension, on installations that still use it), the conversation runs inside that workroom context. That lets analysts keep their agent activity aligned to a specific mission or case while still using the same Kaizen workflows described here.
In a shared non-global workroom, Kaizen agents, conversations, uploads, and generated outputs are visible to authorized workroom members according to role. Owners and Contributors can continue shared conversations, while Viewers can open them read-only. The Global Workroom keeps legacy personal visibility behavior and is not treated as a shared Kaizen workspace.
Launch Kaizen
Kaizen is available as an extension in App Garden.
- Open App Garden in the Kamiwaza UI.
- Locate the Kaizen app and click Deploy.
- Choose whether you want an Ephemeral Session. Leave the default settings unless you have a specific reason to change them.
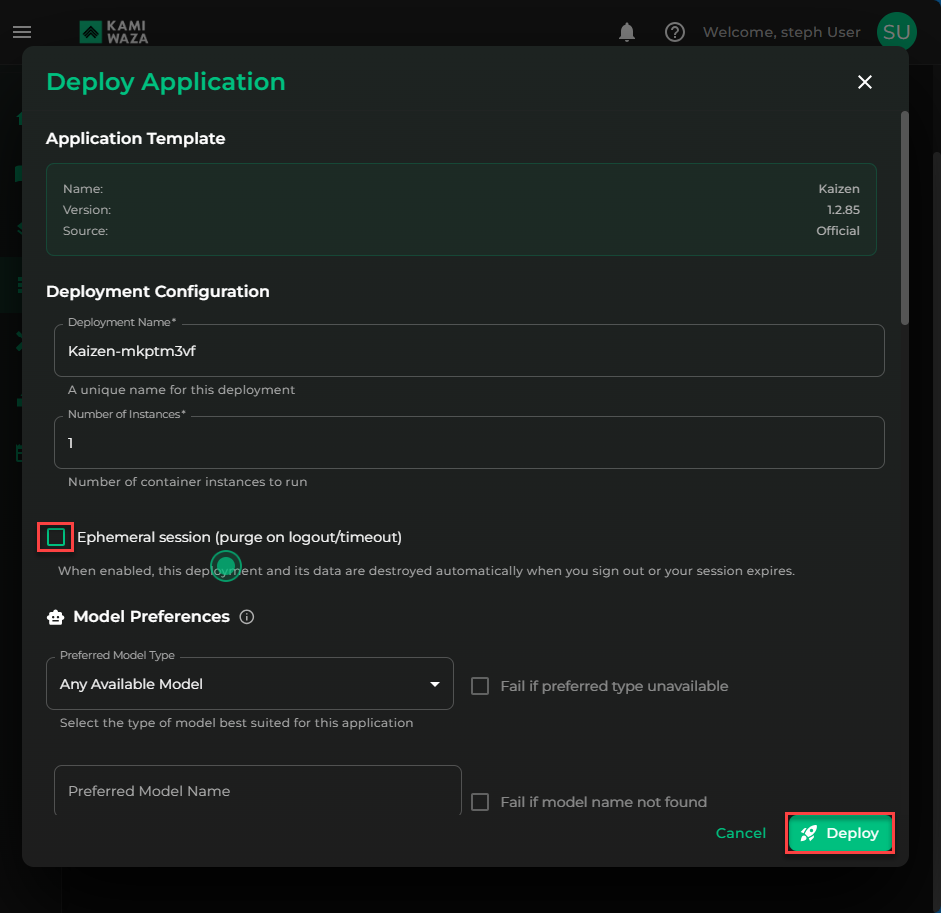
- Click Deploy.
- Once the deployment is ready, click Open App.
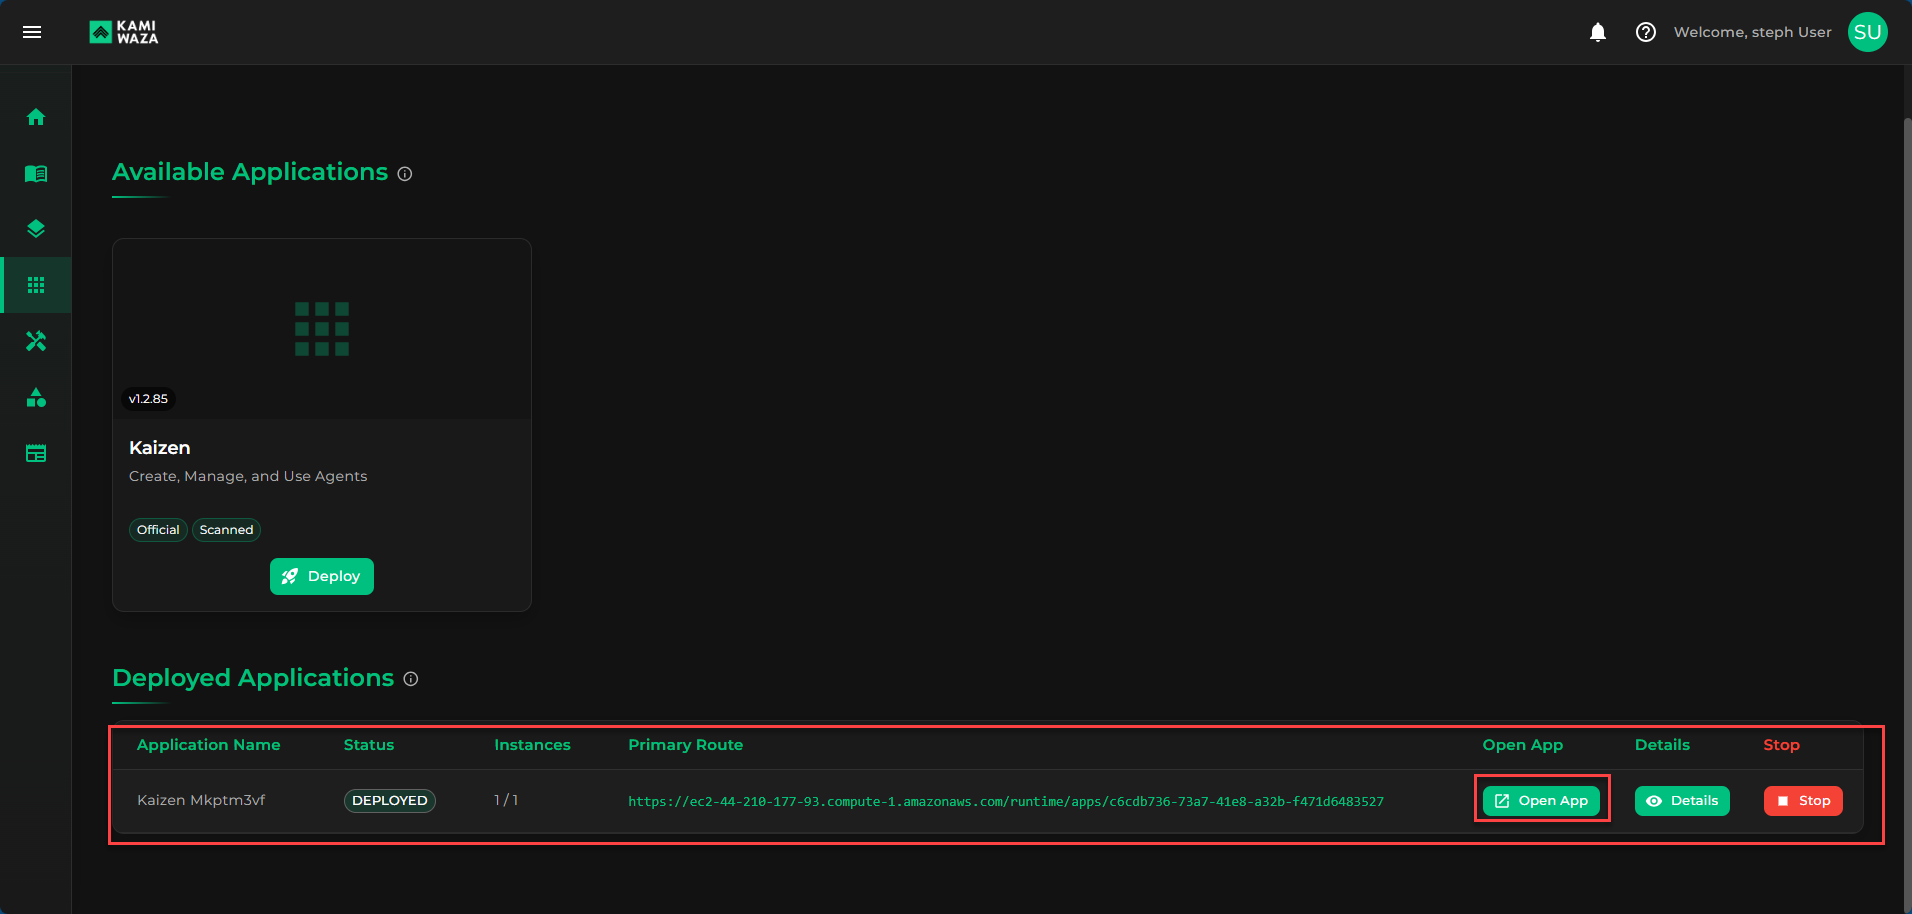
Getting Started
When you first open Kaizen, you'll see an empty Agent Library. This is your home base, where all your agents live and where you launch conversations.
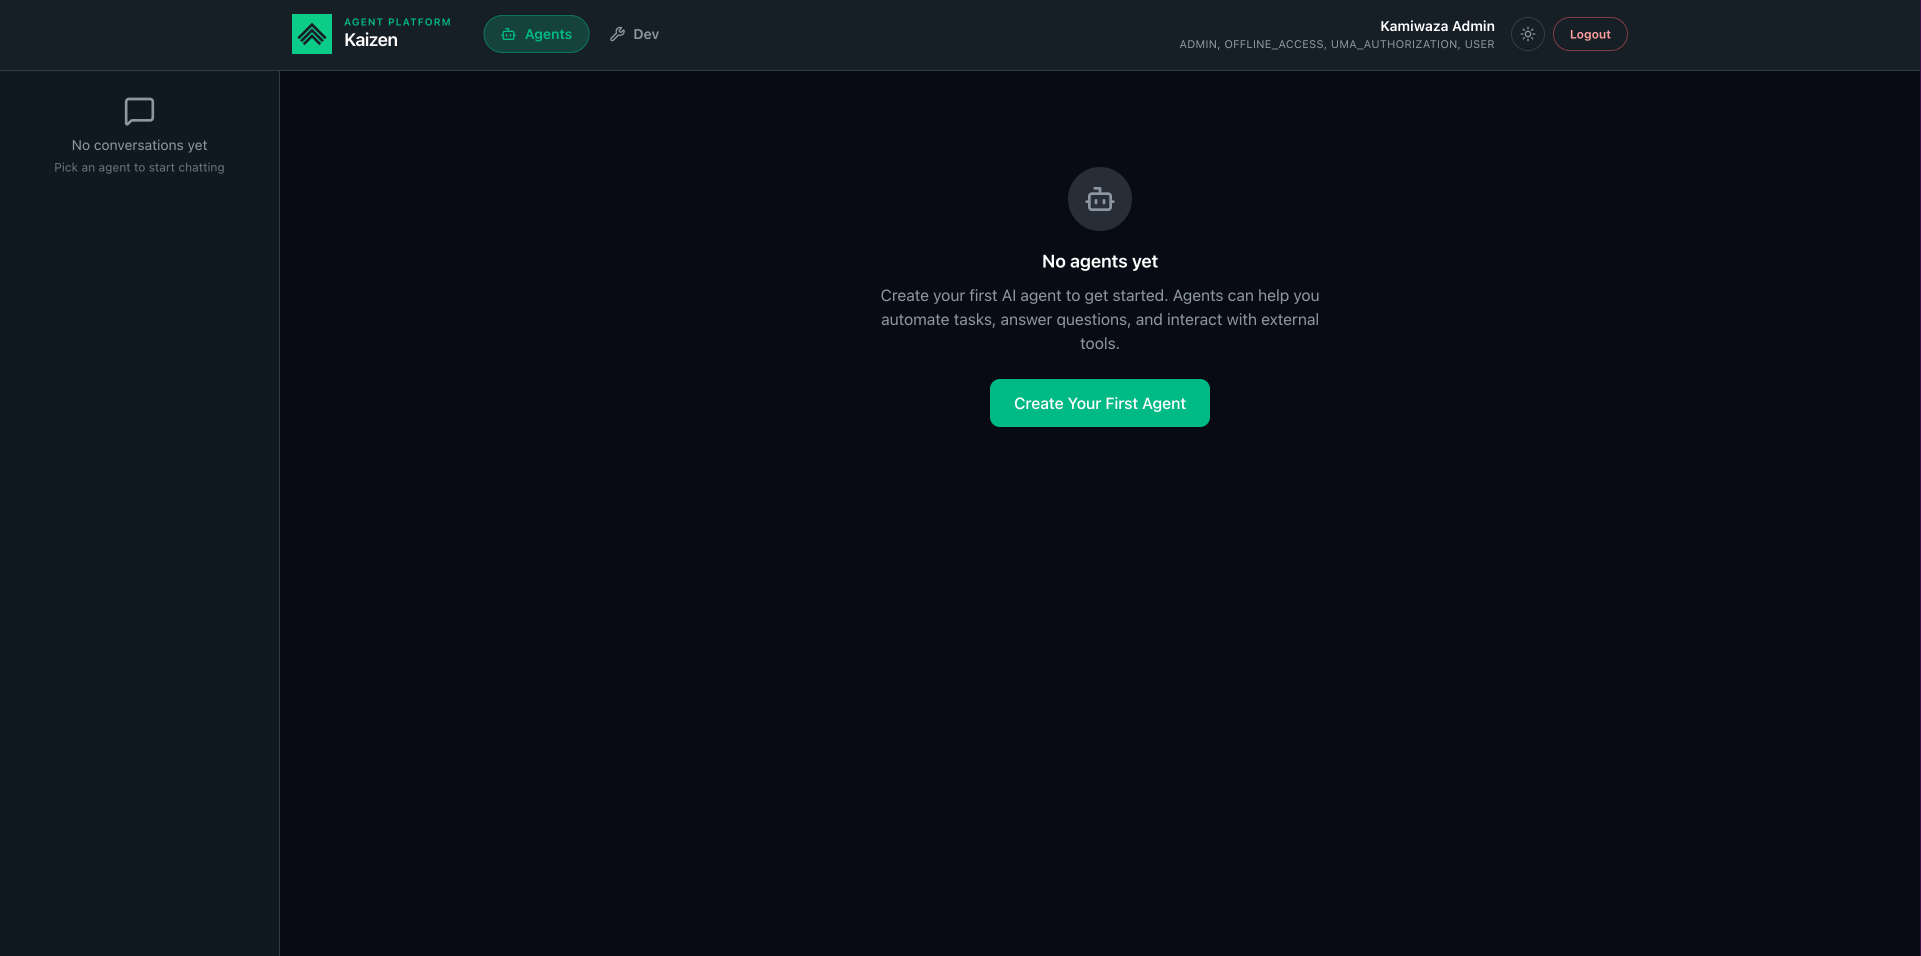
Each agent you create is a persistent configuration. Choose its AI model, attach skills and tools, and set a security policy. Then start as many conversations as you need.
Click Create Your First Agent to get started.
The top navigation bar provides access to all sections of Kaizen:
- Agents — create and manage your AI agents (home view)
- Conversations — browse and filter past conversations across all agents
- Search — search across conversation messages, tool calls, and results
- Metrics — model health and inference metrics for your Kaizen environment
Creating Your First Agent
The agent builder walks you through configuration in six steps.
Step 1: Basic Configuration
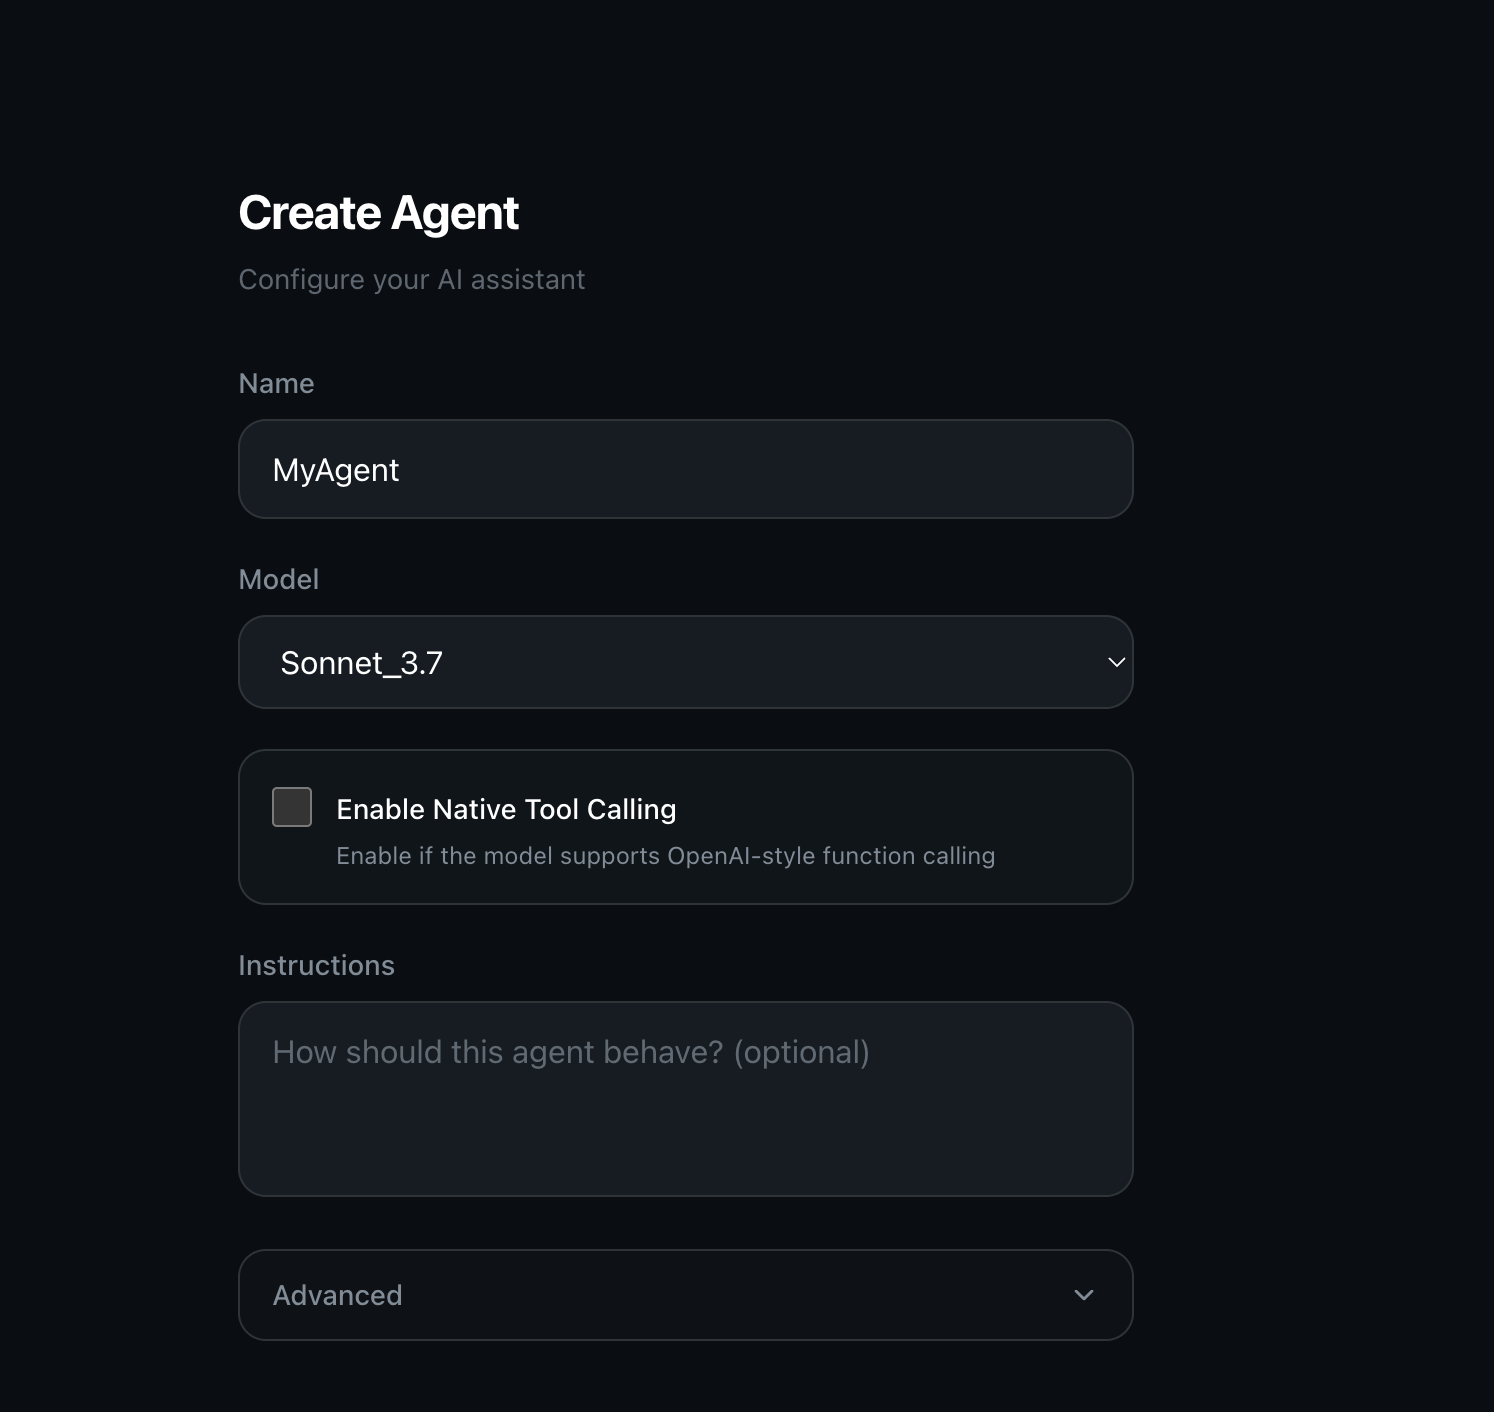
- Name: Give your agent a descriptive name for its purpose, such as "Data Analyst" or "Report Writer".
- Model: Select an AI model deployed on your Kamiwaza instance. Models are managed by your admin through the Kamiwaza Model Library.
- Native Tool Calling: Enable this if your model supports OpenAI-style function calling.
- Instructions: Add optional instructions to shape how the agent behaves, such as domain expertise, tone, or policies.
Tip: Use Instructions to give your agent a specific role. Example: "You are a financial analyst. Always format currency with two decimal places and cite data sources."
Step 2: Adding Skills
Kaizen uses the AgentSkills model. In practice, you can give an agent skills in two ways:
- From Skills Library: Attach published, reusable skills from your shared library.
- Custom Skills: Create agent-specific skills directly in Kaizen.
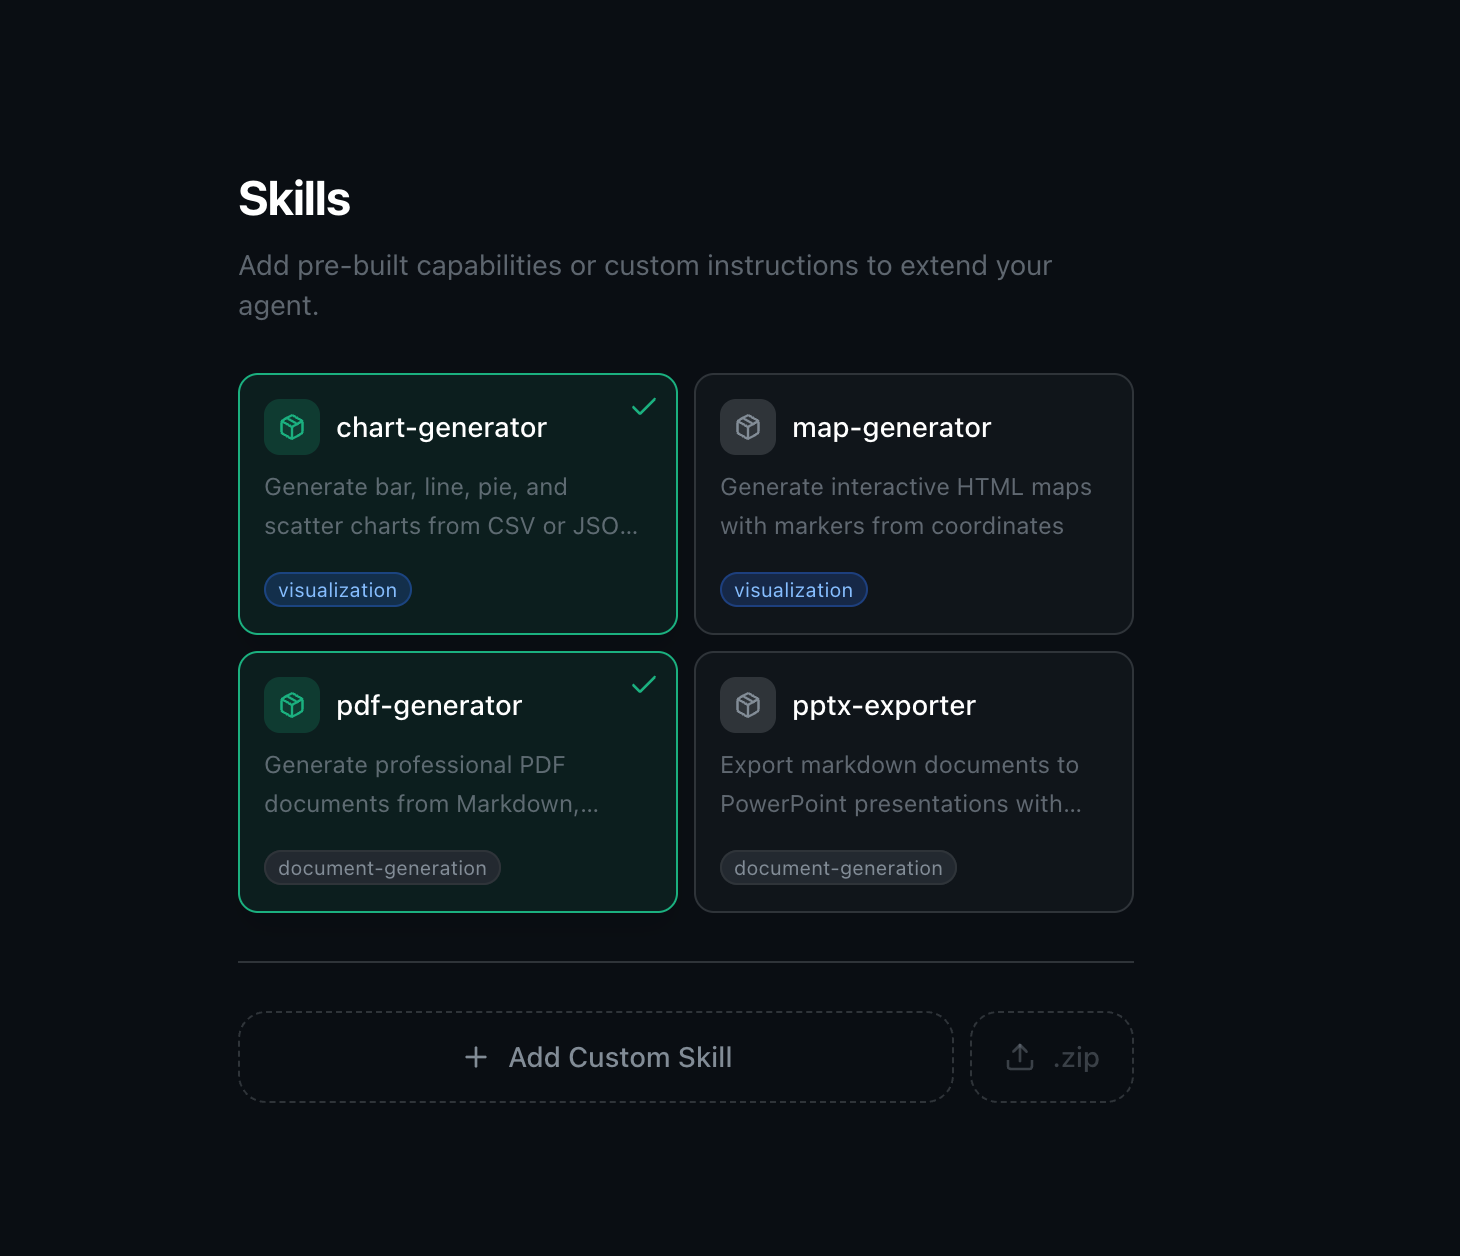
Library skills are best for reusable capabilities your team wants to standardize across many agents. Custom skills are best for local instructions, business context, and lightweight workflows specific to one agent.
Custom skill trigger options:
- Always Active: The skill is always available to the agent.
- Keyword Triggered: The skill activates when matching keywords appear in the conversation.
- Task Triggered: The skill activates from explicit commands or workflow phrases and can include structured inputs.
Tip: Start with a few small custom skills for instructions and domain context, then attach shared library skills for heavier packaged capabilities your team wants to reuse.
Step 3: Attaching Packaged Skills
Many advanced capabilities are delivered as packaged skills from the Skills Library rather than a separate "bundle" system. You can browse the library and attach the skills your agent needs.
Common examples include skills for:
- Charts and visualizations
- Maps and geospatial outputs
- PDF generation
- PowerPoint export
- Document ingestion and context processing
Some Kaizen environments also include built-in default skills automatically, so your agent may already have baseline capabilities without any extra setup.
Step 4: Connecting Tools (MCP Integrations)
MCP (Model Context Protocol) integrations give your agent access to external tools and services such as web search, APIs, databases, and more.
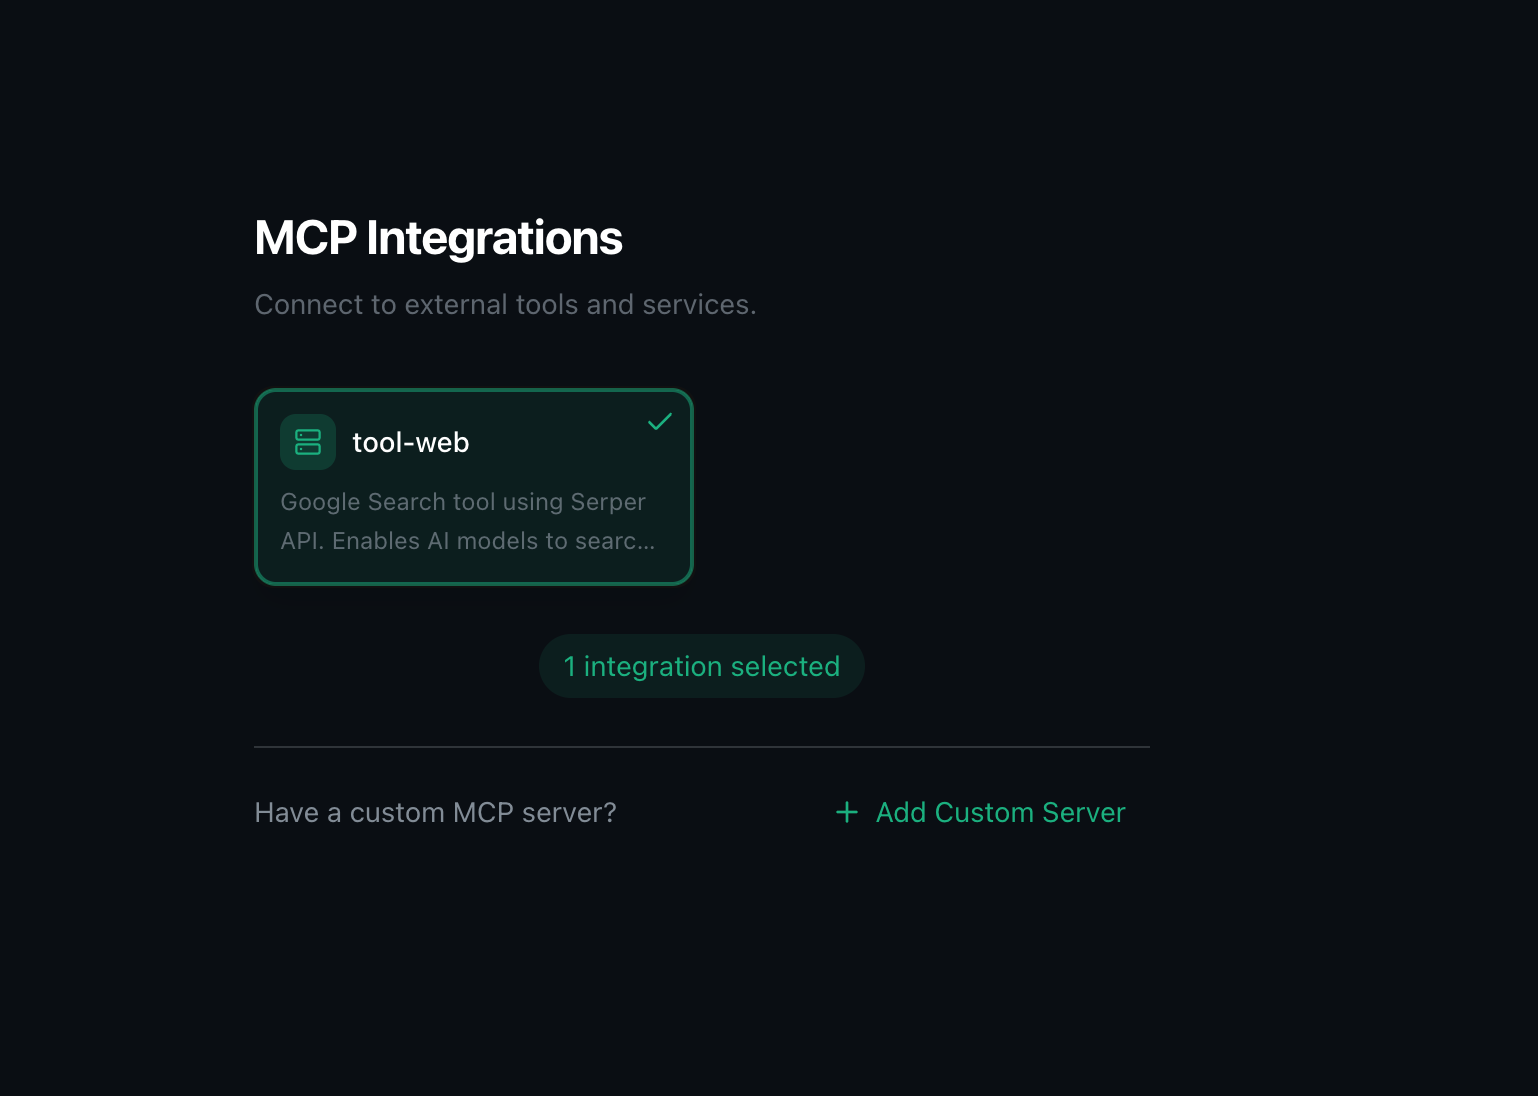
Tools deployed through the Kamiwaza Tool Garden are automatically available for selection here. Your admin deploys tools to the platform, and they appear ready to attach to your agents.
You can also connect custom MCP servers for proprietary or third-party APIs using + Add Custom Server.
Without tools, your agent can only reason and write code. With tools, it can search Google, query databases, call REST APIs, interact with SaaS platforms, and much more within a single conversation.
Step 5: Security Policy
Control how much autonomy your agent has. The security policy determines which actions require your approval before the agent executes them.
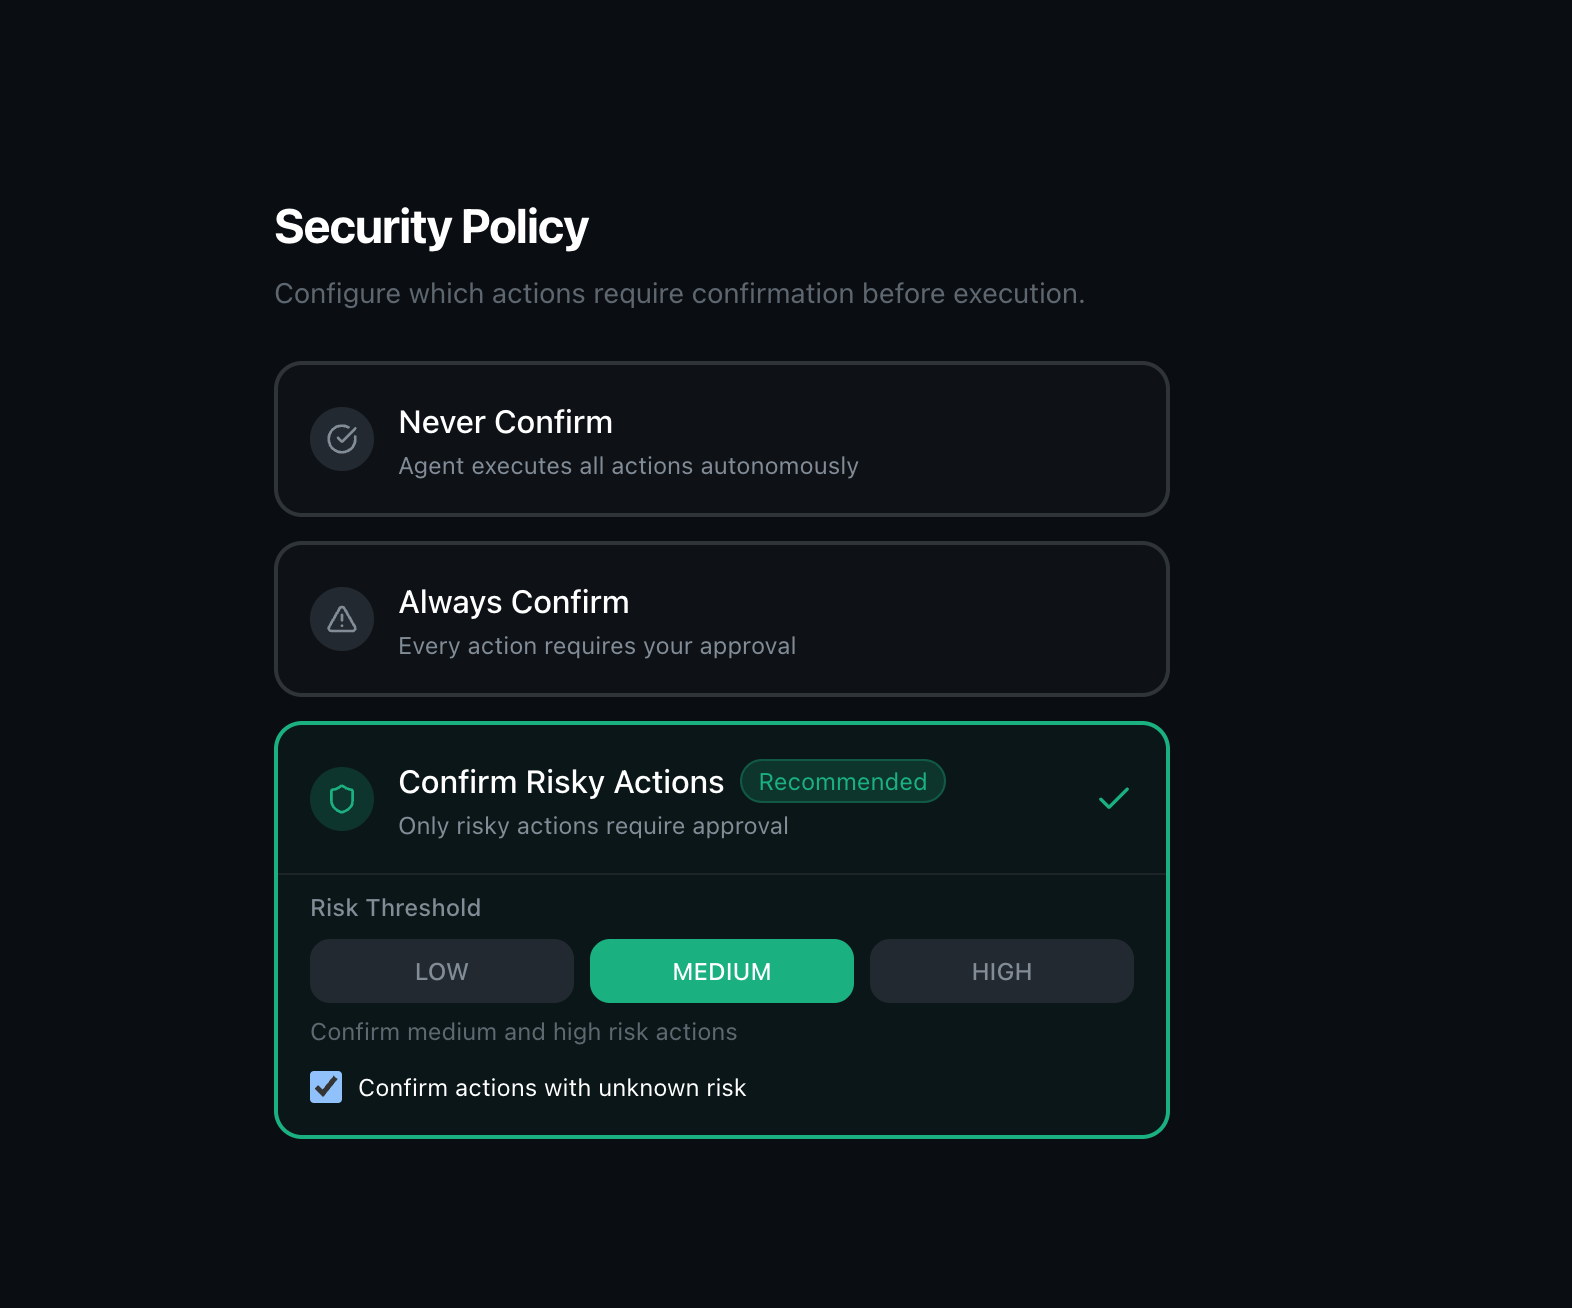
Three modes:
- Never Confirm: The agent executes all actions autonomously. Best for trusted, low-risk tasks.
- Always Confirm: Every action requires your approval.
- Confirm Risky Actions (Recommended): Only actions above your chosen risk threshold need approval. The agent handles routine tasks on its own.
The Risk Threshold (Low, Medium, or High) determines the cutoff. With Medium selected, the agent asks for confirmation on medium- and high-risk actions but proceeds autonomously on low-risk ones. You can also choose whether actions with unknown risk levels require confirmation.
Step 6: Review & Create
Before creating your agent, review the full configuration summary. Verify your model, custom skills, attached library skills, connected tools, and security policy.
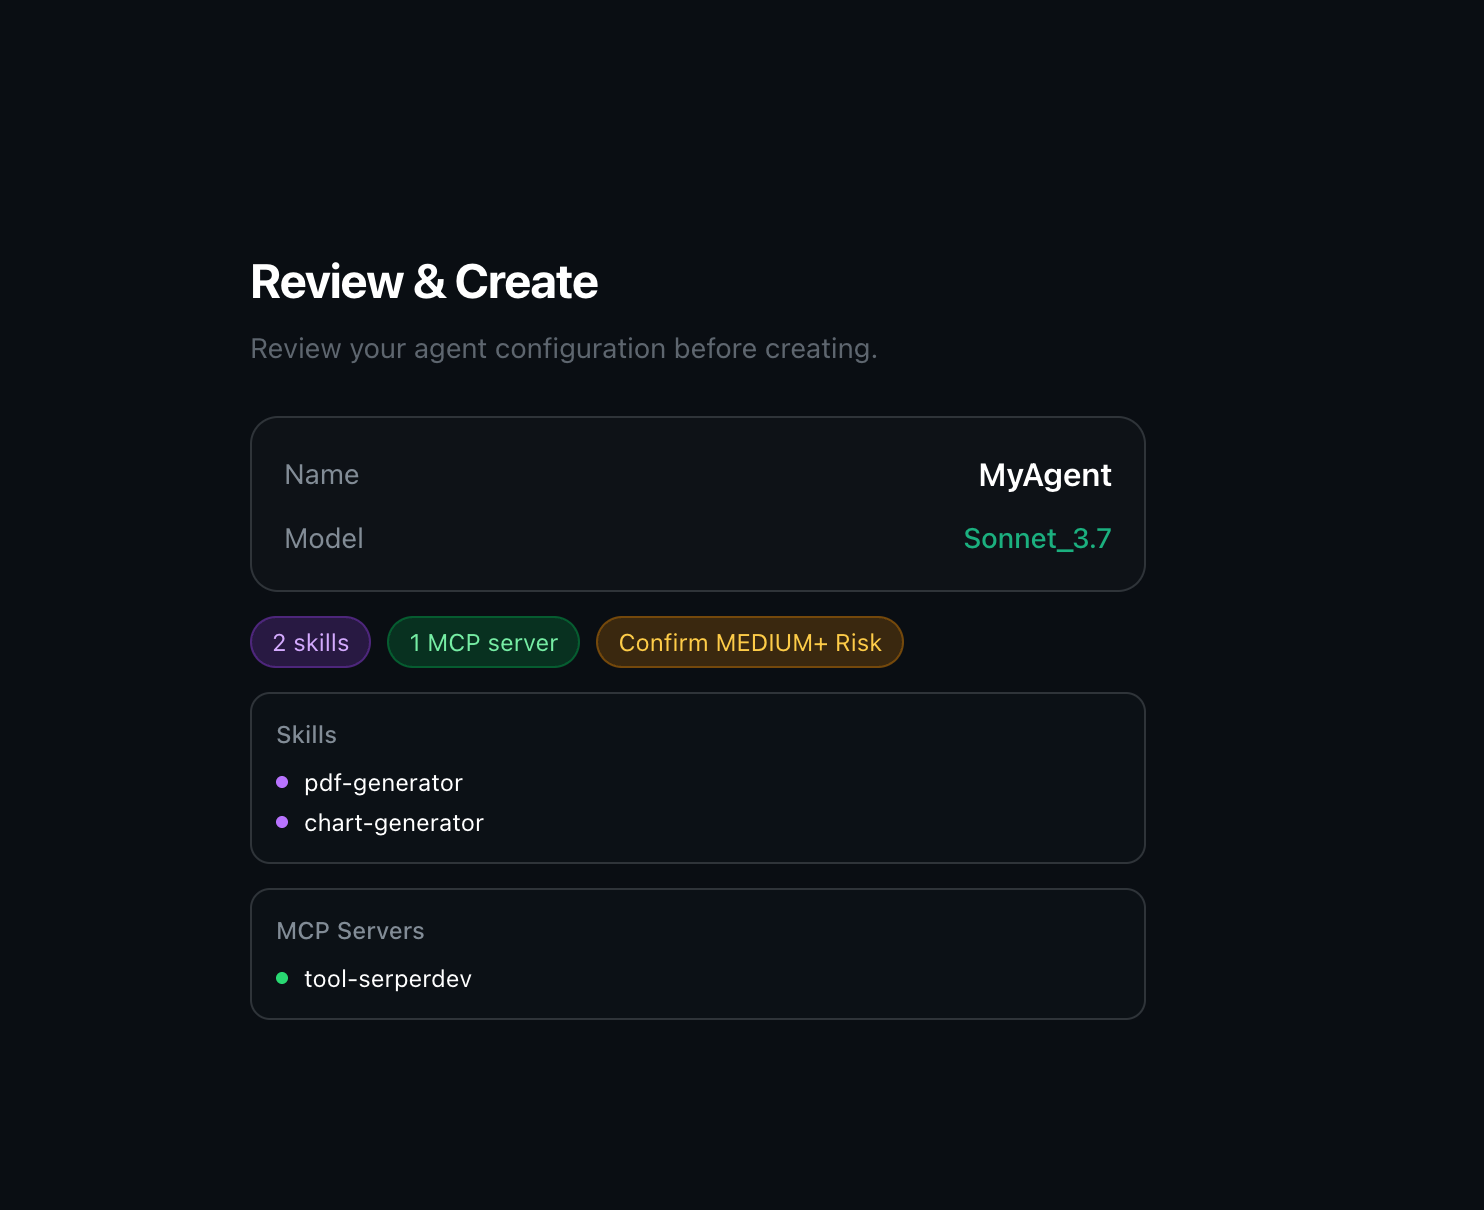
The summary badges give you an at-a-glance view of custom skills, library skills, MCP servers, and security policy. Once satisfied, click Create Agent.
Your Agent Library
After creation, your agent appears in the library. Each agent card shows its name, model, and quick actions.
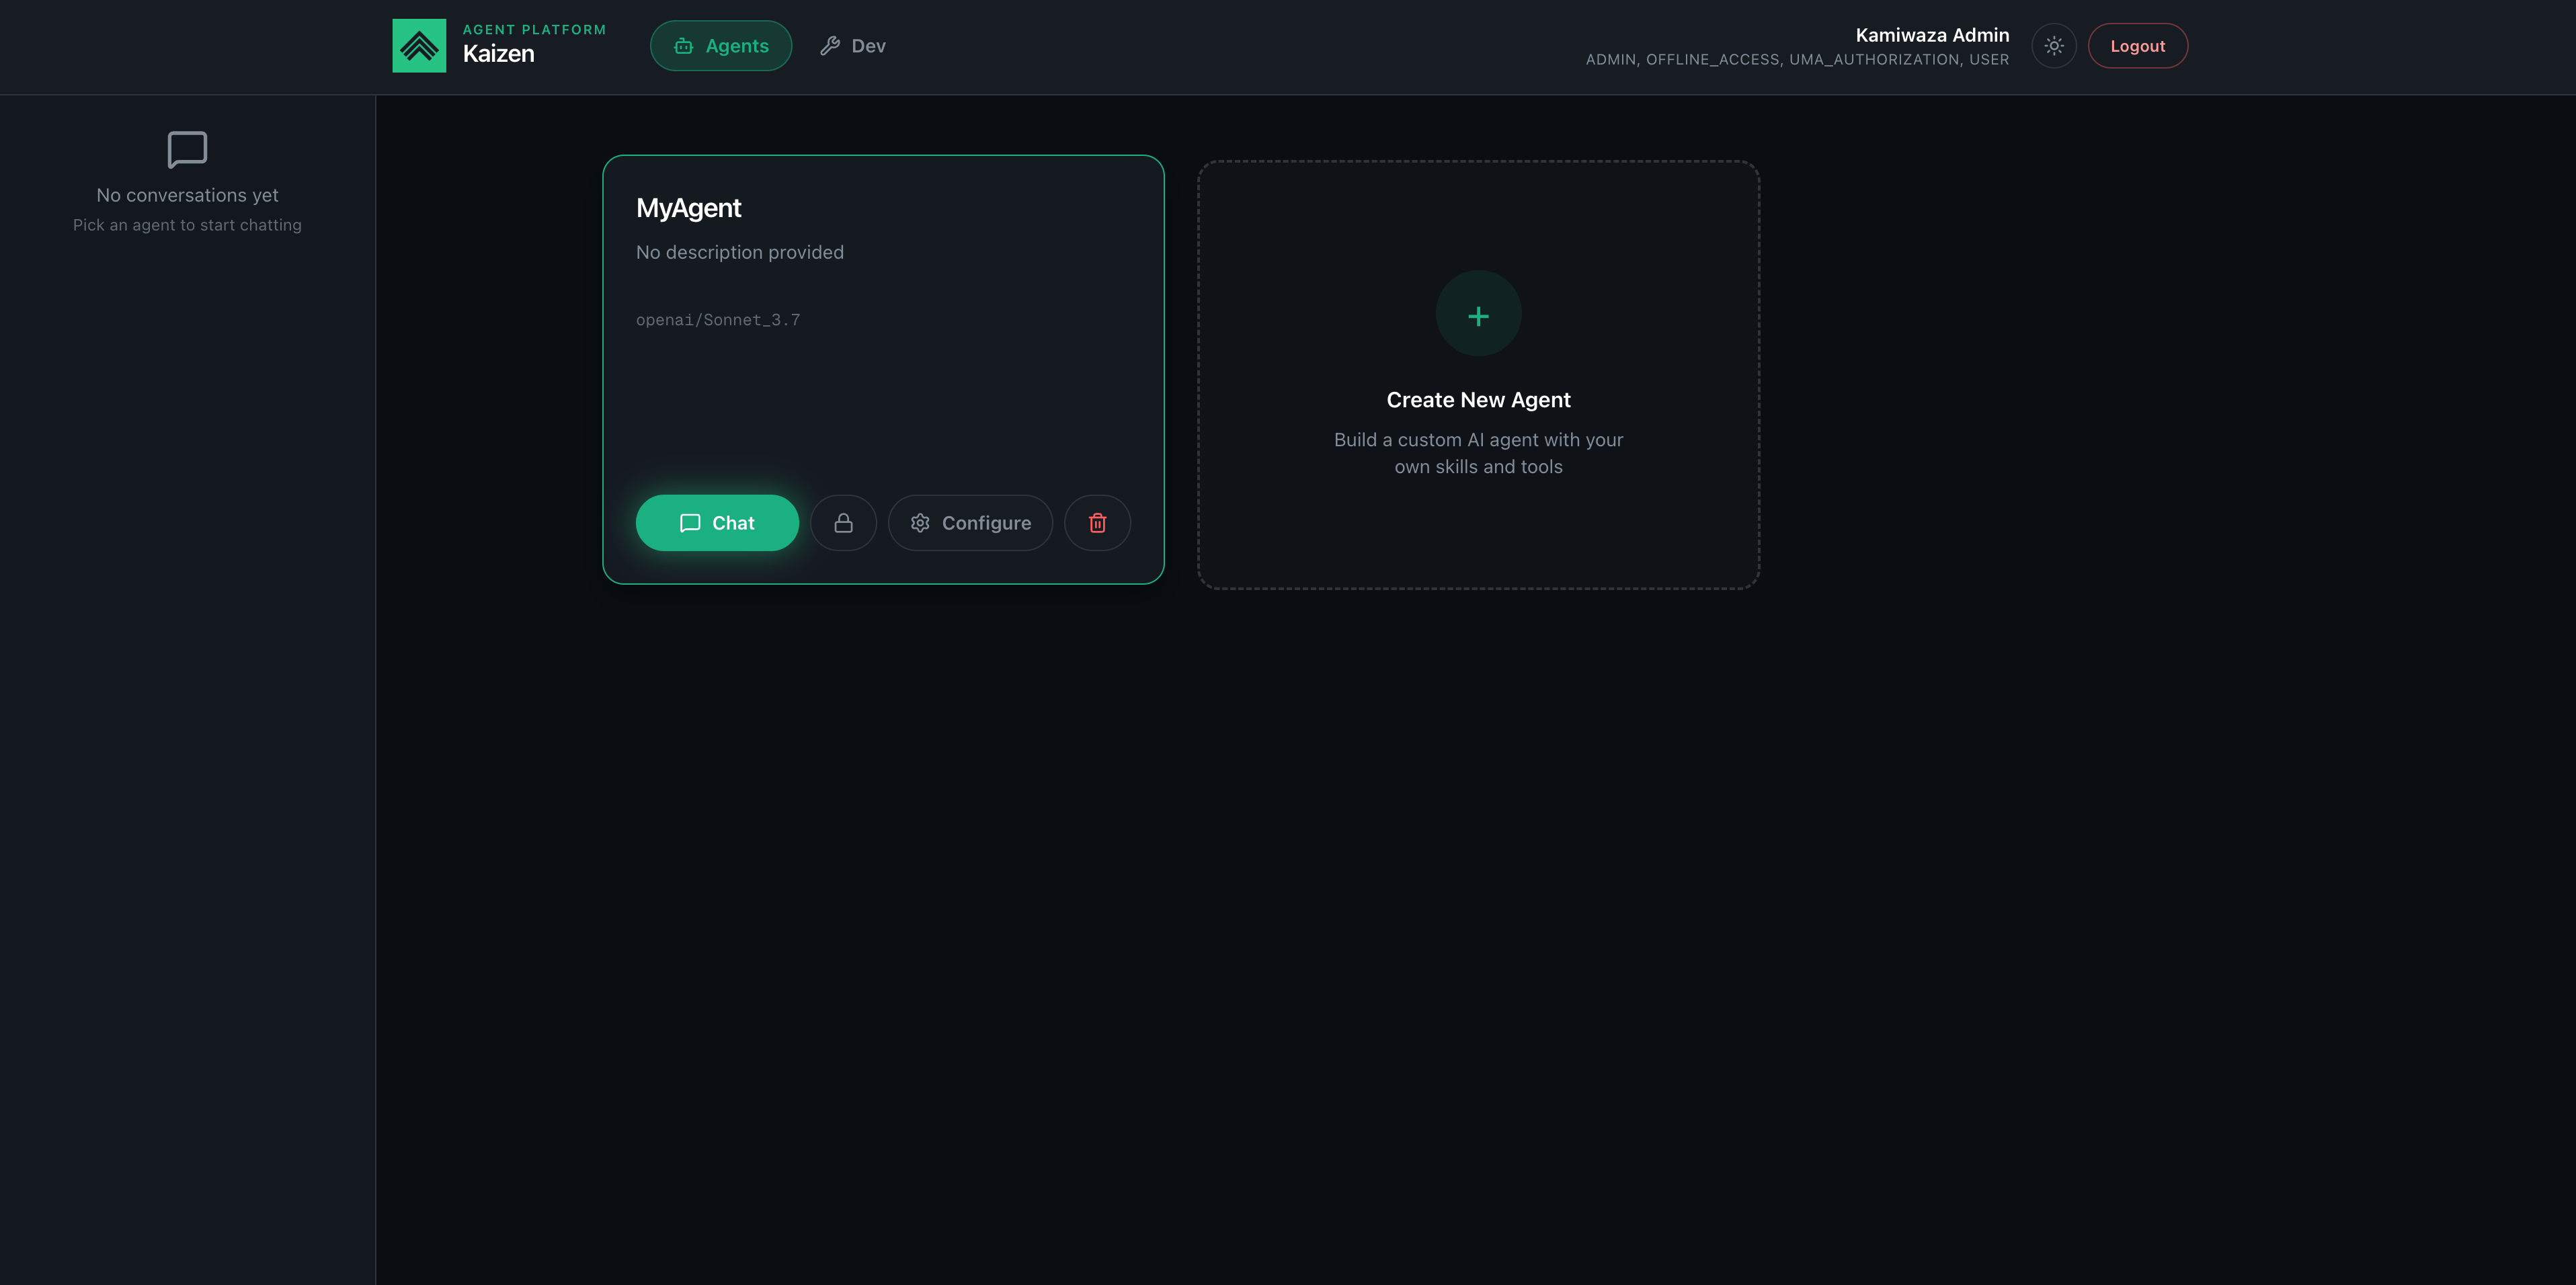
- Chat: Start a new conversation with this agent.
- Private Session: Start an ephemeral conversation that is automatically deleted when you leave. This is available in personal/global scope and is intended for sensitive or one-off tasks.
- Configure: Edit the agent's model, skills, bundles, tools, or security policy.
- Delete: Remove the agent and its conversations.
Create as many agents as you need, such as a research agent, a data analyst, or a report writer. Each agent keeps its own configuration. In a shared non-global workroom, that agent and its conversations are visible to other authorized workroom members, while the creator remains recorded for attribution and auditing. Shared visibility does not automatically grant reuse of the creator's private credentials; collaborator runs continue to use the acting user's own credentials or an explicitly shared workroom credential path.
The left sidebar shows recent conversations across all visible agents. In a shared non-global workroom, that means shared workroom history by default, with a list-level filter for items created by you. Click any conversation to resume where work left off.
Using Your Agent
Sending Messages
Click Chat on any agent to start a conversation. Type your request in the message input and the agent will get to work. You can watch its progress in real time as it executes code, calls tools, and produces results.
Uploading Files
Click the + button in the message input to attach files. You can upload from your local device or pull files directly from Microsoft 365 (OneDrive, SharePoint).
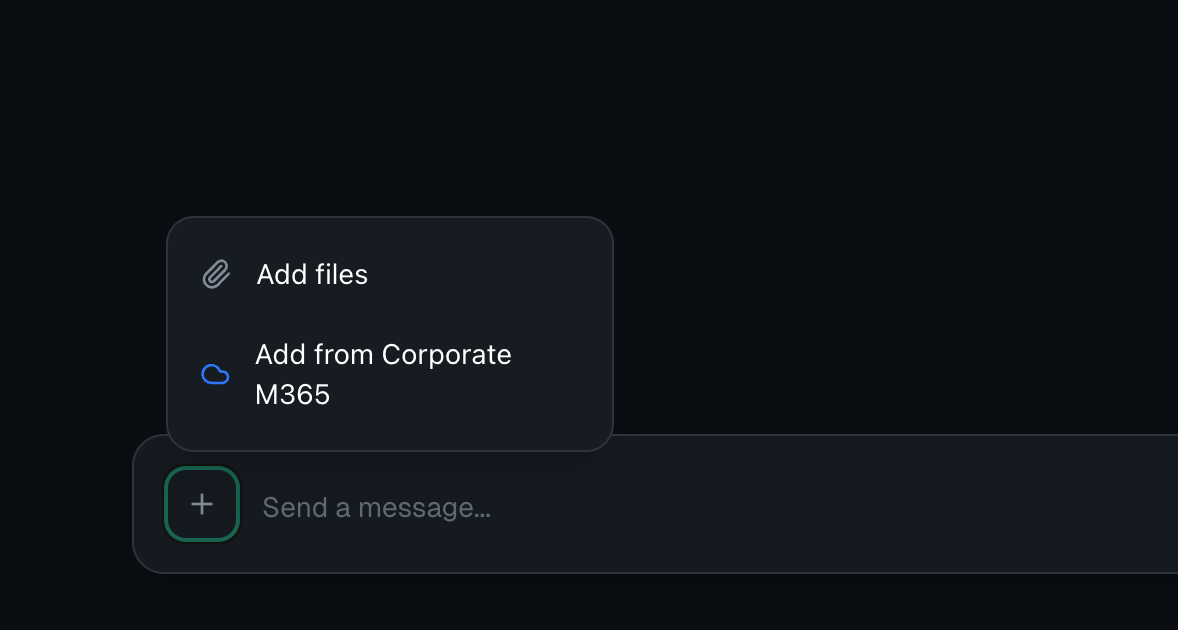
Note: The Microsoft 365 connector must be configured by an administrator in the Kamiwaza UI before it is available to users. Once configured, you can browse and attach OneDrive and SharePoint files directly in your conversations.
When Kaizen is opened from a workroom, use these uploads and connected sources to support that workroom's analysis workflow.
Grounded Answers and Citations
Depending on your deployment and the tools attached to your agent, Kaizen can produce grounded answers that include citations back to source material such as uploaded files, connected document stores, or web results.
To get the best results:
- attach the files or tools your agent should use before asking the question
- ask explicitly for citations when you need traceable answers
- verify that the cited sources actually support the claim before sharing the output
If a response should be grounded but comes back without citations, check whether the relevant data source, skill, or retrieval path is configured in your environment.
Related Data Suggestions
Current Kaizen builds can show a Related Data Suggestions card around an active conversation. This panel aggregates likely useful:
- workspace files
- published or attached skills
- Microsoft 365 results
Each suggestion includes a score and a short reason so you can decide whether to pull that source into the conversation. Kaizen keeps partial results visible even if one source is degraded. For example, if an M365 connector is unavailable or a search times out, the panel can still show file or skill suggestions together with a diagnostic note instead of failing the entire suggestion pass.
Use this panel when you want to ground the next turn, find the right file faster, or understand why Kaizen thinks a specific skill or document may help with the current task.
Downloading Results
Any files created by the agent, including reports, charts, code, and presentations, appear in the workspace panel on the right side of the chat. You can preview and download them directly.
Preview behavior depends on file type. In current releases, Kaizen can render:
- presentations as slide previews
- DOCX files as extracted inline text
- images such as SVG and WEBP inline in the browser
- CSV and Excel files in a table view
If a file type is not previewable in place, use the same panel to download it.
Your Agent in Action
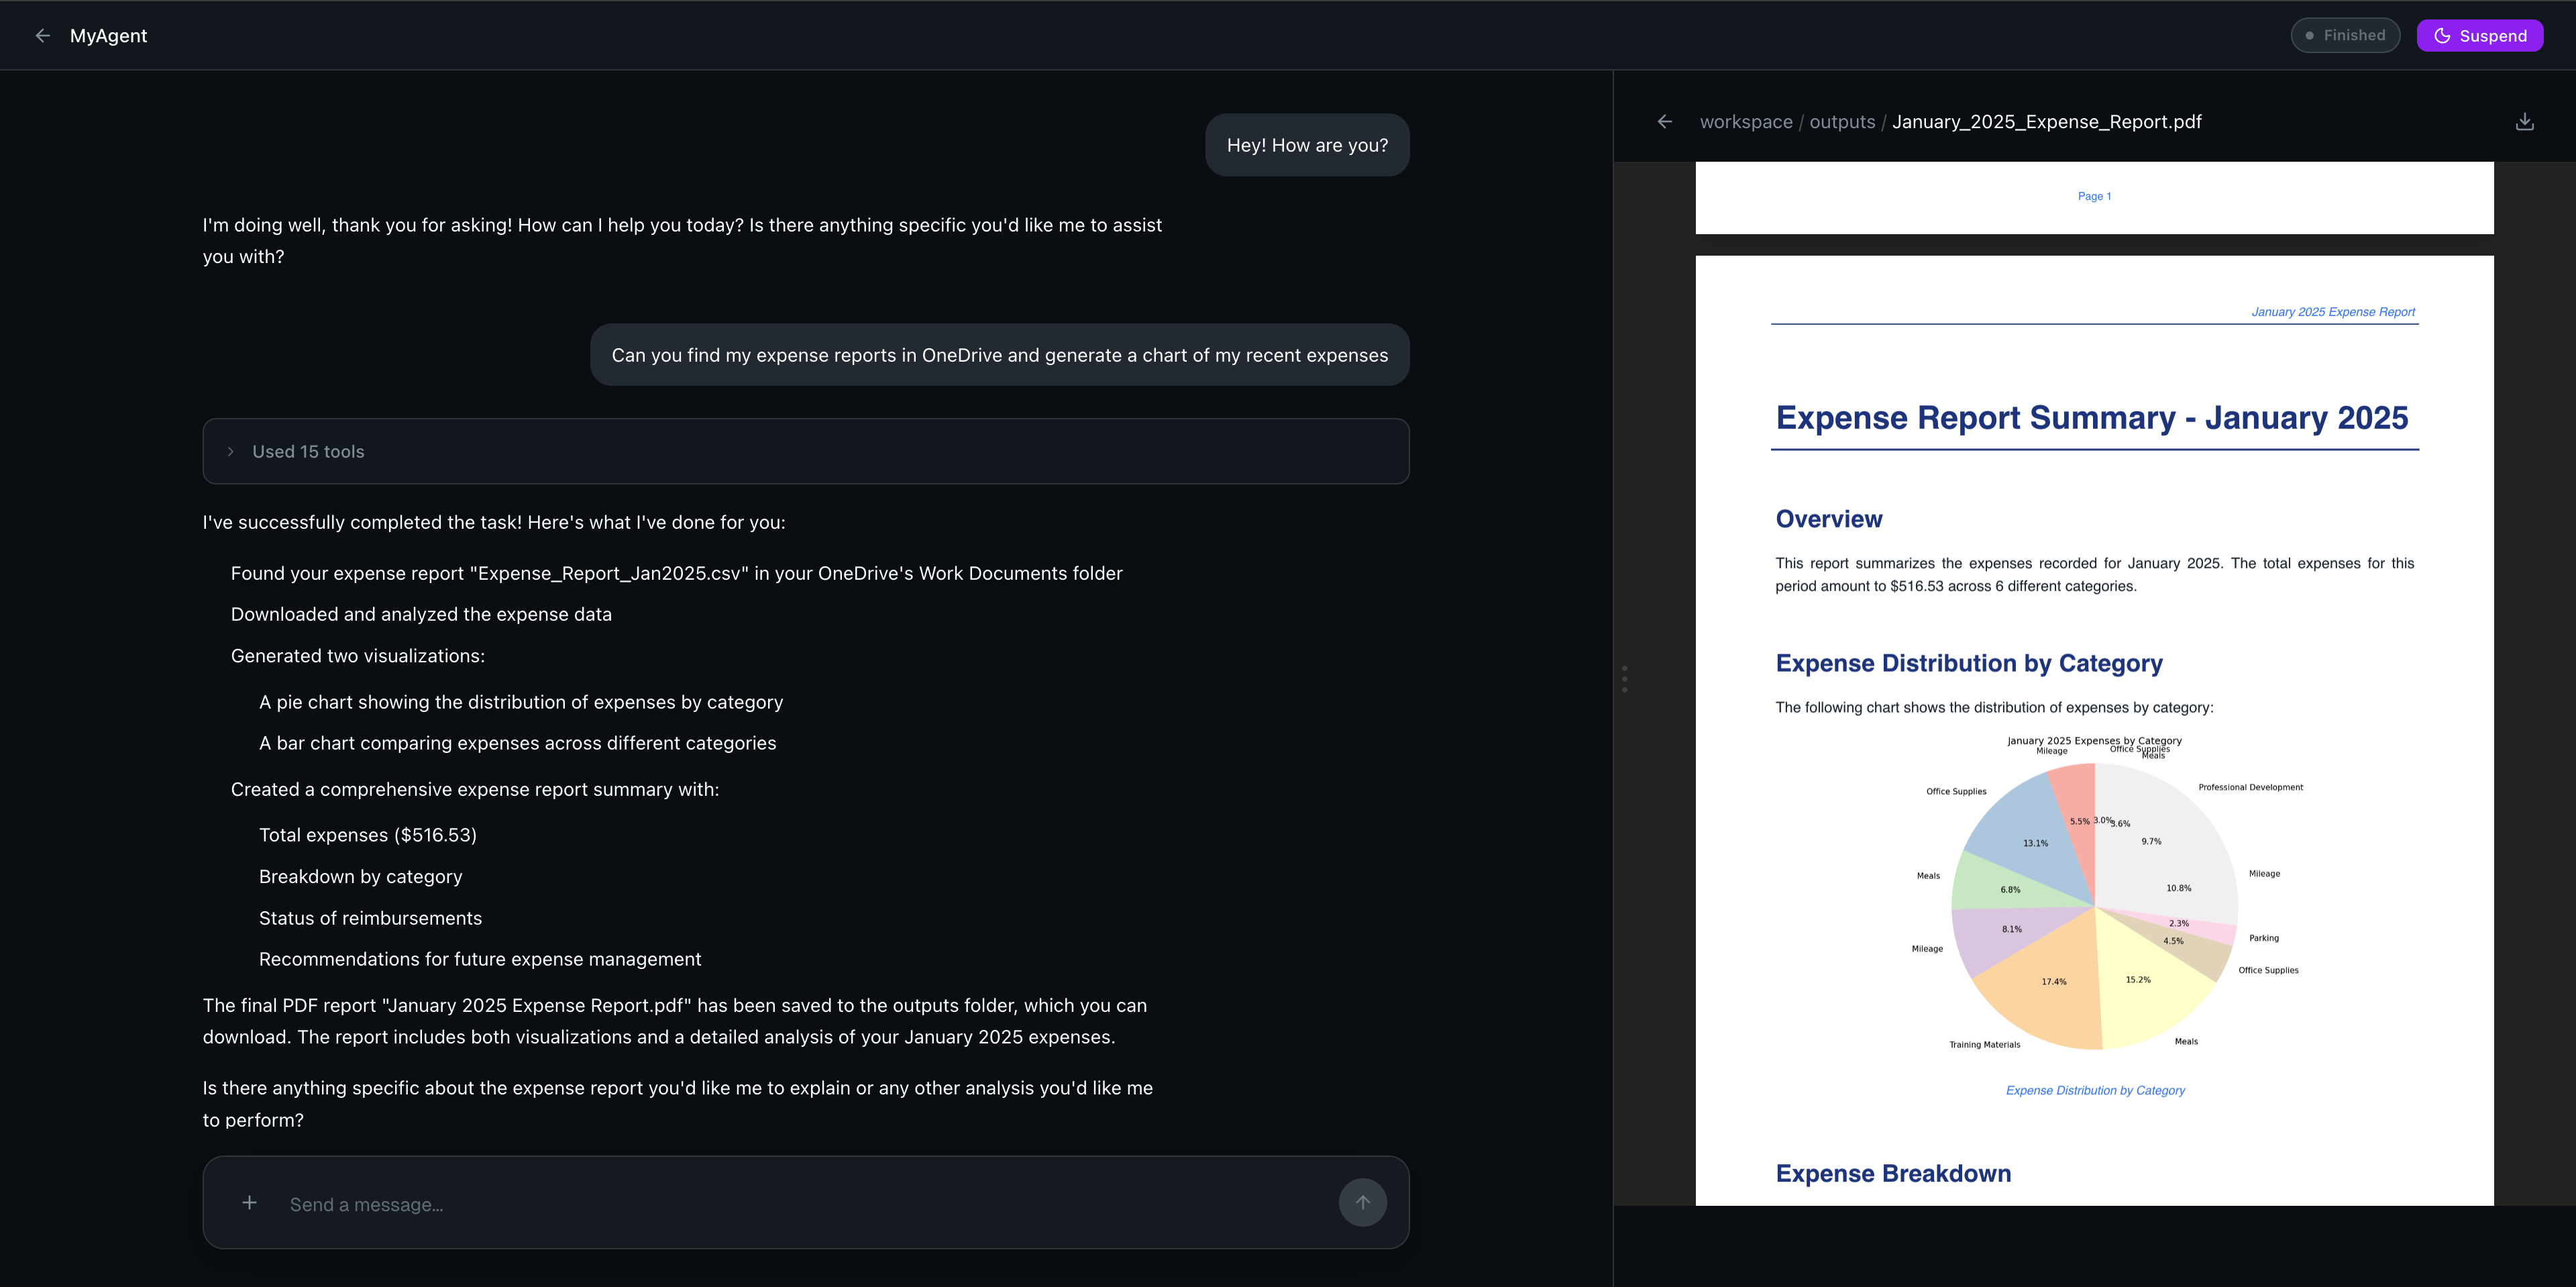
Here is a real example: a user asked their agent to find expense reports in OneDrive and generate a chart and summary PDF. The agent:
- found the expense report CSV in OneDrive
- analyzed the expense data
- generated a pie chart and bar chart
- created a professional PDF report with the analysis
The generated PDF is viewable and downloadable directly in the right panel.
Conversations
The Conversations tab gives you a dedicated view of all visible conversations across every agent.
Use the filters at the top of the page to narrow down what you're looking for:
- Filter by Agent — select a specific agent to see only its conversations, or choose All Agents.
- Visibility — switch between all workroom-visible conversations and only the ones you created.
- Sort By — order conversations by most recent or other criteria.
In a shared non-global workroom, this view is designed for handoff as well as recall. Click any conversation to resume where work left off, even if another Owner or Contributor created the earlier turns.
Search
The Search tab lets you search across all your past conversations to find specific messages, tool calls, and results.
Searching Conversations
Enter a search term to find matching content across all conversations. You can refine results with filters:
- Tool Name — filter by a specific tool (e.g., web search, code execution, file access).
- Event Type — filter by the type of event (messages, tool calls, results).
- Date Range — narrow results to a specific time window using the From and To date fields.
Click Search to run your query. Results show matching content with context so you can quickly locate what you need.
Recipes
The Recipes tab (next to Search) lets you save useful tool call patterns that you discover while searching. Recipes capture a reusable pattern so you can reference it later without having to search for it again.
To create a recipe, find a tool call pattern in your search results and save it. Your saved recipes appear in the left sidebar for quick access.
Recipes are useful for:
- Capturing effective tool call sequences that produced good results
- Building a personal library of proven patterns for common tasks
- Sharing approaches across sessions without recreating them from scratch
Metrics
The Metrics tab shows model health information for your Kaizen environment.
The view displays inference performance and model availability metrics. Use the time range selector (24h, 7d, 30d) to adjust the reporting window.
The Metrics view is most useful once you have active agents running conversations and processing data.
Workroom Collaboration
When Kaizen is launched from a workroom, a workroom info bar appears at the top of the page showing the workroom name and classification banner. Click it to expand the workroom status summary.
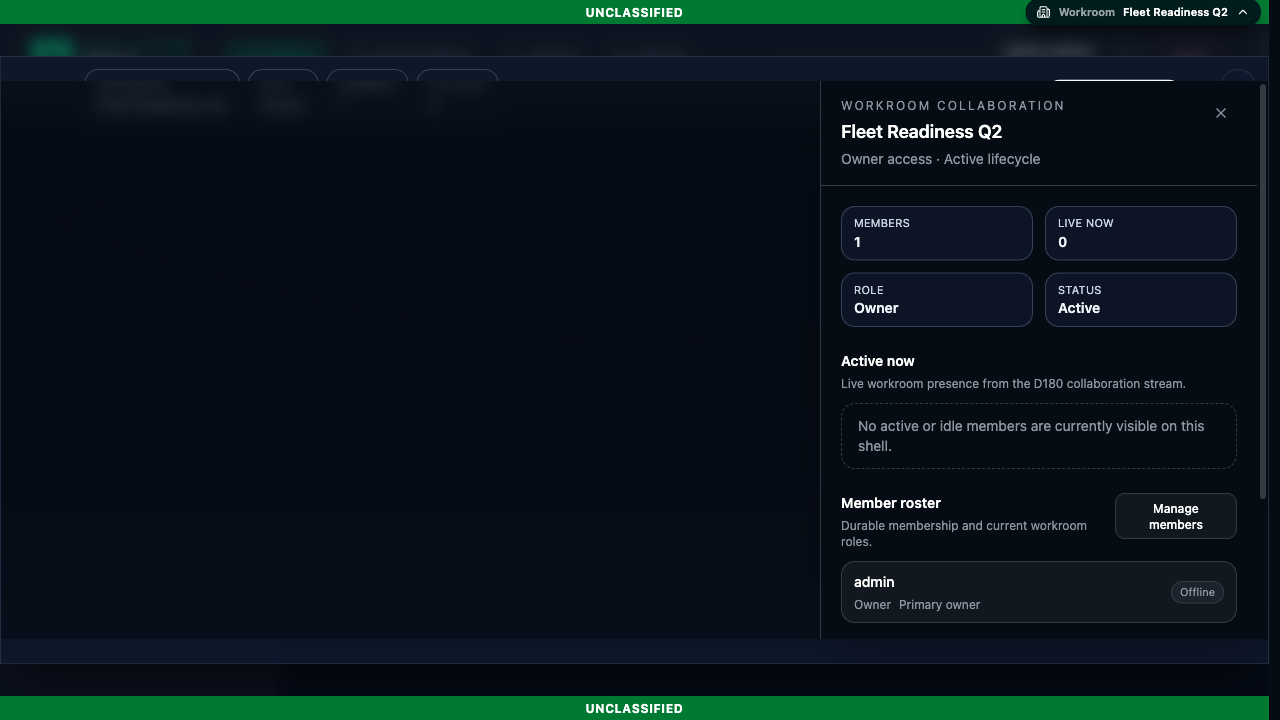
The expanded bar shows:
| Field | Description |
|---|---|
| Workroom | The name of the workroom this Kaizen session belongs to. |
| Role | Your role in the workroom (Owner, Contributor, or Viewer). |
| Members | Total number of members with access to this workroom. |
| Live Now | How many members are currently active in the workroom. |
Click Collaboration to open the full collaboration panel on the right side. The panel includes:
Active Now
Shows which members are currently active or idle in the workroom. This is a live view from the collaboration stream — use it to see who else is working in the same workroom at the same time.
Shared History
In a shared non-global workroom, Kaizen keeps conversation history as shared workroom history. Later Owners and Contributors can open the same thread and continue it without losing prior context. Viewers can read that history but cannot add turns, upload files, or mutate agent settings.
Turn Attribution
Kaizen attributes each human or agent-triggering turn to the acting user who initiated it. That attribution stays with the turn for later handoff and review; it is not inferred from the original conversation creator.
Member Roster
Lists all workroom members with their roles and online status. Owners can click Manage members to open the membership management panel from within Kaizen. The Workrooms page (or the deprecated Workroom Manager extension, on installations that still use it) is the standard place for workroom administration, including sharing, role changes, member removal, and ownership transfer.
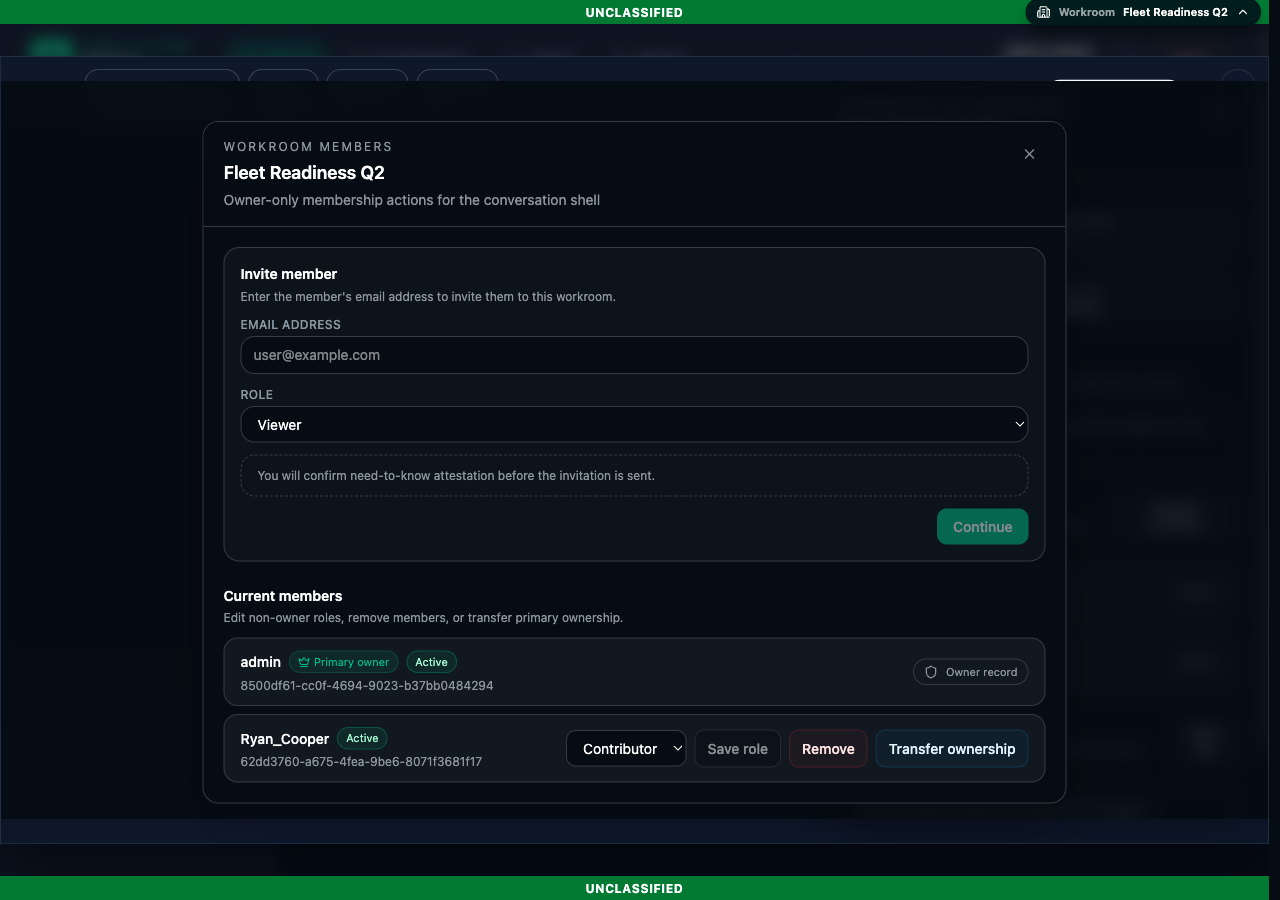
The Workroom Members panel lets owners:
- Invite a member — enter an email address, select a role (Viewer or Contributor), and confirm the attestation: "I confirm the invited user has need-to-know for this workroom's content."
- Change a member's role — use the role dropdown on any non-owner member and click Save role.
- Remove a member — click Remove to revoke access. If the member has an active session, you may be asked to confirm.
- Transfer ownership — click Transfer ownership to make another member the primary owner of the workroom.
Audit Log
Tracks recent lifecycle, membership, credential, and access activity for the workroom. Click Open log to view the audit timeline. Use the audit log to verify who changed membership, delegated credentials, or modified workroom lifecycle state during the current collaboration window.
Shared Credentials
Shared visibility does not automatically grant access to another member's private credentials. If a shared agent depends on a connector, API key, or OAuth session, the acting user must use their own credentials or an explicitly workroom-shared credential binding when that capability is enabled in your environment.
Agent Capabilities
| Capability | Description |
|---|---|
| Generate Documents | Create PDFs, PowerPoint presentations, and structured reports from your data or instructions. |
| Create Visualizations | Bar charts, line charts, pie charts, scatter plots, and interactive maps from your data. |
| Search the Web | Find current information, research topics, and gather data using connected search tools. |
| Access Corporate Files | Browse and analyze files from OneDrive and SharePoint through the Microsoft 365 integration. |
| Analyze Data | Process CSV files, run calculations, identify trends, and produce statistical summaries. |
| Connect to APIs | Interact with external services through MCP tool integrations, including CRMs, databases, and SaaS platforms. |
| Code Execution | Run commands and scripts in an isolated container environment. |
| Real-time Streaming | Watch the agent's thought process and terminal output live. |
| Security Policies | Configure sensitive-action controls with risk-based confirmation. |
Tips for Success
- Start Simple: Create your first agent without complex skills or tools, then add them as needed.
- Be Specific: Clear, detailed prompts yield better results.
- Use the Skills Library: Attach published skills for common outputs like charts, PDFs, presentations, and document processing.
- Check Connections: If you use MCP tools, verify connections before saving.
- Monitor Status: Watch for "Waiting for Confirmation" states if you have strict security policies.
Example Prompts
- "Create a Python script that analyzes this CSV data and generates a summary report."
- "Find my expense reports in OneDrive and generate a chart of spending by category."
- "Research the latest trends in renewable energy and create a PowerPoint presentation."
- "Analyze this dataset and create a PDF report with visualizations."
Troubleshooting Kaizen
The agent is waiting for confirmation
Your agent's security policy may require approval before it can run tools or commands. Approve the pending step, or update the policy in the agent configuration if the current threshold is too strict for the workflow.
I cannot access Microsoft 365 files
The Microsoft 365 connector must be configured by an administrator before it appears to end users. If the option is missing or authentication fails, confirm the platform configuration with your administrator.
I expected citations, but none appeared
Make sure the agent has access to the documents or tools it needs, and ask for citations explicitly when traceability matters. If the issue persists, verify the data source or retrieval configuration in your deployment.
I need logs for a failed deployment or broken conversation
Start with the Kaizen deployment logs in the Kamiwaza log viewer, then review the platform-level guidance in Observability. That is the fastest path for diagnosing extension startup failures, connector issues, or model-side errors.